
 I’m not sure if this is true with all (or even most) guys, but if someone mentions a secret room, secret safe, secret stairway, secret compartment, or the like, I’m immediately interested. Maybe this is because they’re always connected with adventure. Maybe it’s just because the idea of keeping something secret is appealing (not that I have anything valuable enough to hide, but anyway…).
So I asked my dear wife for a secret compartment book for Father’s Day. It turned out pretty cool (I can’t post pictures of my book here, obviously, because then it wouldn’t be secret), and we decided to make another one as a gift for someone we know (I can’t tell you who because…well, the whole “secret” thing). I found several resources online but thought I’d explain the basic process in case anyone wants to give it a try.
 Step One: Choose a nice thick book that won’t be conspicuous. This dictionary will blend in on the recipient’s office shelf (if we had purchased, for example, “The Complete Baby Name Book” it might have stood out from the crowd).
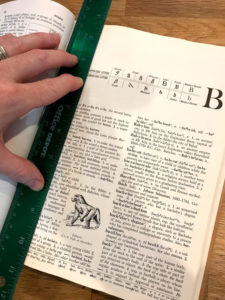 Step Two: Turn about 20 or so pages into the book (these pages will still be able to turn in order to add to the this-is-just-a-normal-book feel). Then, using a ruler measure and trace out a rectangle the size of the desired compartment. Don’t go too close to the spine and leave a healthy amount of margin (see pics below to see how much room we left on each side).
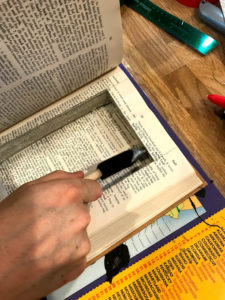
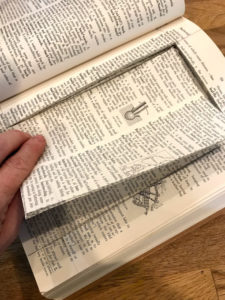 Step 3: Now for the tedious part. Use an exacto knife or box cutter to begin cutting down into your book along the lines. The corners are the trickiest part and you may want to cut past the actual corners of your rectangle in order to get them cut as neatly as possible. Cut down through as many pages as you can and then carefully peel them out.
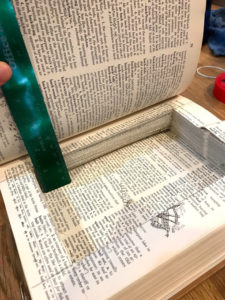 Step 4: Keep cutting down until you reach the desired depth of the secret compartment (looks like we went down about an inch and a half). NOTE: Make sure you are cutting straight down. Think about opening a big book in the middle: the pages slide so that the edges are no longer lined up with one another. If you’re not careful, you’ll end up with an angled box. We had to prop the front cover up perpendicular to the bottom cover to keep the pages straight.
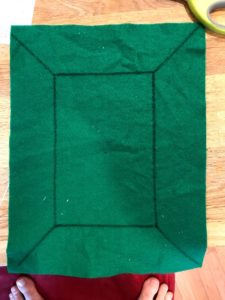
Step 5: Now for the felt lining. First we lined our felt up with one of the cutouts. You want plenty of overlap so the felt piece will cover all the sides of the secret compartment (and then some). Then we drew and cut out the corners (see pics).


 Step 6: Now take some regular-old Elmer’s Glue and coat the bottom and sides of the secret compartment. You want them coated lightly and not saturated; the wetter they are the more the pages will wrinkle.
 Step 7: Carefully press in the felt piece. This is tricky. Try to avoid bunching up at the corners. You really want the felt to extend above the lip of the compartment so it can fold down flat on the top page. Fill up the empty space with something solid to help the felt keep its shape (we used Jenga blocks). Then you can trim the overlapping felt to a half inch or so and glue it down as well
 Step 8: After this glue has dried for a bit (you needn’t wait too long), remove the blocks and glue down one uncut page overtop the empty compartment. This will cover up the overlapping felt. Later, you’ll have to come back and cut out the hole from this page. Then, place a plastic bag overtop the book cover and all the remaining uncut pages. This is to prevent them from getting glued together when you seal up the sides. NOTE: In this picture, the uncut page you see (with the “B”) is the single page glued overtop the compartment. All the other uncut pages are inside the plastic bag. I believe we had a problem here with the green felt showing through and ended up gluing down a second page
 Step 9: Now spread glue over the sides of the book just as you did the insides of the compartment.
Step 10: Put some heavy books on the whole thing and let it sit overnight. When you wake up in the morning, carefully lift the plastic bag (with the cover and uncut pages) and cut out the compartment from the single page that covered it. If everything looks good, you’re done! If not, some additional trimming or gluing might be needed. Practice makes perfect!
I need to think of something I’d like to hide and then I will try this! A great project for a rainy day!